
Mohenjo-daro!
Mohenjo Daro, or "Mound of the Dead" is an ancient Indus Valley Civilization city that flourished between 2600 and 1900 BCE. The site was discovered in the 1920s and lies in Pakistan's Sindh province. Only a handful of archaeologists have excavated here, described in the introduction and illustrated essay Mohenjodaro: An Ancient Indus Valley Metropolis.
These 103 indexed images were taken over 30 years. Most have not been published before. By Jonathan Mark Kenoyer.

|
1. Lower Town in the mist On an early winter morning the mist settles in the low-lying areas of Mohenjo daro between the "citadel" and the "lower town". In the distance the heavy mist on the Indus River forms a solid white… |

|
2. Indus River at Mohenjo-daro Rice fields almost ready for the fall (kharif) harvest reach to the edges of the Indus River near Mohenjo-daro. The flood plain on the far side of the river is covered by a vast scrub forest that… |

|
3. Mohenjo-daro "Citadel" mound and Stupa in the mist Local villagers cross the site in a donkey cart in the early morning mist, with the Buddhist stupa perched on top of the "citadel" mound. The modern road winds through the low-lying area between the … |

|
4. Kids in Mohenjo-daro These two local boys decided to hang out in the ancient city after delivering a pot of milk to their father who is one of the site watchmen. The distinctive decorated hat worn by the older boy is… |

|
5. Sunrise over Mohenjo-daro The winter sun rises over the site while the mist clings to the mounds. The mounds of the "lower town" are barely visible above the mist and in the foreground are the edges of brick structures… |

|
6. Mohenjo-daro "Citadel" Mound and Stupa The eroded edges of the "citadel" mounds are covered with red brick dust and pottery, with traces of lighter mud brick revealing the underlying platforms that form the foundations of the uppermost… |

|
7. The Indus River and "lower town" After the mist has cleared, the Indus River is clearly visible from the top of the "citadel" mound. The two small rectangular huts are used to contain conservation equipment needed to maintain the… |

|
8. Farmlands to the west of Mohenjo-daro West of the "citadel" mound are lush farmlands watered by modern irrigation channels. A levee protecting the site from annual floods divides the irrigated land from the salt encrusted sediments… |

|
9. Northeastern sector of Mohenjo-daro: DK-G area north The northeastern sector of Mohenjo-daro was excavated by K. N. Dikshit and designated DK-G area. Pathways allow visitors to visit the excavations, and an unexcavated portion of the site in the right… |

|
10. Northeastern sector of Mohenjo-daro: DK-G area south The northeastern sector of Mohenjo-daro was excavated by K. N. Dikshit and designated DK-G area. Pathways allow visitors to visit the excavations, and an unexcavated portion of the site in the right… |

|
11. Mohenjo Daro Lower Town: VS Area VS Area is directly to the east of the citadel mound. |

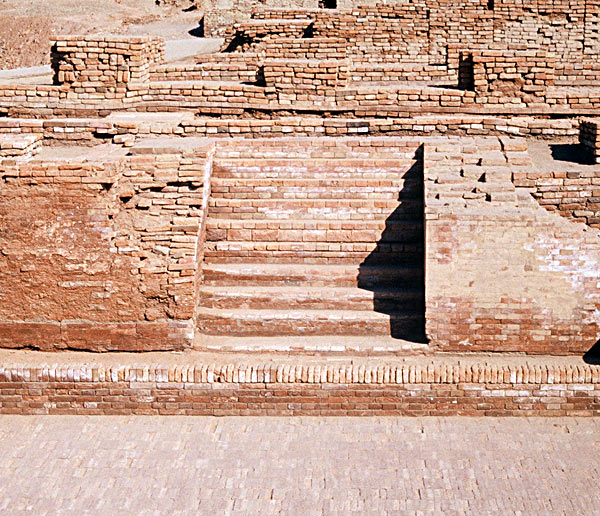
|
12. Mohenjo Daro Lower Town: HR Area HR Area is located southeast of the citadel mound. Large areas of the mound have not yet been excavated and are covered with eroding brick structures and pottery. |

|
13. Mohenjo Daro Lower Town: VS Area A view of the houses and streets in VS area, with the citadel and stupa mound in the background. The tops of eroding buildings have been capped with a protective layer of mud brick that will help to… |

|
14. Mohenjo-daro Lower Town: HR area and Stupa This general view of houses in HR area shows the color of the brick walls prior to use of mud brick and clay slurry for conservation. The lower parts of the walls have the natural reddish color of… |

|
15. Mohenjo-daro Lower Town: VS area and Stupa View This general view of houses in VS area shows the color of the brick walls after the use of mud brick and clay slurry for conservation. The lower parts of the walls have the natural reddish color of… |

|
16. Mohenjo-daro Lower Town: Main Street HR/VS area and stupa view Standing in HR area and looking northwest at the juncture of Last Street (east west) and First Street (north south). VS area is seen on the other side of the street and the stupa mound rises in the… |

|
17. Conservation of brick walls in DK - G Area, Lower Town One relatively successful low cost techniques used to combat the destructive nature of salts in the fired bricks is to cover the walls with a thick layer of mud and straw plaster and to spray them… |

|
18. Eroded surface of the mound DK-I Area The pathway leading from VS to DK-I area follows the natural topography of the mounds. The eroding surface is littered with over fired nodules, pottery, brick fragments and other artifacts that are… |

|
19. Room in between L and SD Areas Narrow brick walls define the outlines of a small room or courtyard in the low-lying area between L and SD Areas on the Citadel Mound. A standard size of mud brick and baked brick (7 x 14 x 28 cm)… |

|
20. Lower Town: HR Area mud brick platforms The foundations of many houses were constructed on top of massive mud brick platforms such as this one eroding from the edge of the mound along the major east-west street dividing HR and VS areas… |

|
21. Nodule and Pottery Foundation fill, HR Area Some of the later houses in HR area were constructed on top of massive deposits of garbage consisting of brick rubble, broken pottery and sometimes a thin layer of crushed, vitrified terracotta… |

|
22. Excavation Debris Pile, DK-I Area Earth and debris excavated from the houses and streets of DK-I area was dumped directly onto parts of the unexcavated mound, making it difficult to discern where the original mound ends and where the… |

|
23. Great Bath and Granary, SD Area The Great Bath is situated along a north-south street with a drain covered with limestone blocks. In the background is the so-called Granary, while in the foreground are the walls of several domestic… |

|
24. Great Bath and Granary, SD Area, looking west from the stupa mound The great bath surrounded by a brick colonnade, measures approximately 12 meters north-south and 7 meters wide, with a maximum depth of 2.4 meters. In the background is a massive brick structure with… |

|
25. Great Bath, SD Area, looking north The Great Bath was entered using two wide staircases, one from the north and one from the south. The floor of the tank is watertight due to finely fitted bricks laid on edge with gypsum plaster… |

|
26. Lower ledge inside the Great Bath, SD Area, southern edge, looking east At the foot of the stairs is a small ledge with a brick edging that extends the entire width of the pool. People coming down the stairs could move along this ledge without actually stepping into the… |

|
27. Great Bath, SD Area, looking north The side walls of the tank were constructed with finely fitted bricks and a thick layer of bitumen (natural tar) was laid along the sides of the tank to keep water from seeping through the walls and… |

|
28. Great Bath, SD Area, looking north The tank would have been open to the sky, but the surrounding structures would have been roofed. The sidewalls and parts of the floor have been conserved using modern replica bricks. The original… |

|
29. Lower ledge and Drain outlet, Great Bath, SD Area, looking west At the southwestern corner of the sloping floor, a small drain first passes through the massive walls of the tank and connects to a corbelled arch drain that curves along the edge of the northern… |

|
30. Great Bath, SD Area The floor slopes down to the southwest corner where a small outlet (top right) leads to a brick drain, which takes the water to the edge of the mound. |

|
31. Corbelled Drain exiting the Great Bath This drain cuts through the edge of the so-called granary. If the entire drain were constructed along with the Great Bath, this feature would indicate that the original "granary" was built before the… |

|
32. Looking out from inside the drain The corbelled arch drain from the great bath is large enough to walk into. It has a small ledge on either side of the actual drain channel. |

|
33. L Area as seen from the Stupa Mound Standing on the edge of the mud brick drum of the Buddhist Stupa, one looks south to L Area. The courtyard of the stupa has cells of the associated monastery, and below these are Indus buildings. In… |

|
34. L Area Some buildings in L area are constructed on top of a massive mud brick platform that can be seen here as grey-olive mud brick below the eroding red fired bricks. |

|
35. Pillared Hall, L Area The pillared hall was approximately 27.5 meters square (90 feet square) with twenty square brick pillars arranged in four rows, only two of which are still preserved. Strips of paved floors sloped… |

|
36. Pillared Hall, L Area Close-up view of the pillared hall, which may have been a hall of assembly with paved walkways and places for people to sit in ordered rows along each aisle between massive brick pillars. |

|
37. Lower Street 3, HR Area Looking south along Street 3, which runs parallel to First Street in HR area. Agricultural fields and scrub jungle south of the site are visible in the distance. |

|
38. College Building Courtyard, SD Area A large open space or courtyard (10 meters square) is surrounded by a wall that had 13 openings, possibly for windows. This unique structure is situated in the northern part of an extremely large… |
 with Stupa in background")
|
39. Gateway (ACC Area) with Stupa in background A massive block of brick architecture at the southeast corner of the "citadel" mound was thought to represent a gateway with large brick bastions. Later construction of a wall (in the center of the… |

|
40. Granary, SD and REM area Built on top of a tapered brick platform, this building had a solid brick foundation that extended for 50 meters east west and 27 meters north south. The foundation was divided into 27 square and… |

|
41. Eroded face of Granary The eroding wells and a wall built up against the granary show that much of the area to the north of the granary was filled with debris and later buildings. |

|
42. View of well to the east of the Granary Looking from the top of the granary towards the remains of two wells and the wall that were constructed in the area to the north of the structure. The drain from the great bath would have run along… |

|
43. Western Staircase, House I, HR area Many houses had stairs leading to upper courtyards of the building or to a second floor. This house in HR area had a double staircase that would allow people to enter and exit the upper courtyard in… |

|
44. House I, HR area House A1 may have been a temple or palace of an important leader. Two doorways lead to a narrow courtyard at a lower level. A double staircase leads to an upper courtyard surrounded by several rooms… |

|
45. Well surrounded by paving, DK-B area This well located in DK-B area was originally surrounded by a paving that has recently been reconstructed. |

|
46. Well surrounded by paving, DK-B area This well located in DK-B area was originally surrounded by a paving that has recently been reconstructed. |

|
47. Toilet, HR area Toilets would have been an essential feature in Mohenjo-daro, but the early excavators identified most toilets as post-cremation burial urns or sump pots. This brick structure (one of two - see Slide… |

|
48. Toilets, HR area Two structure with a hole and drain located are thought to have been toilets. While these two structures may have been unique examples of toilets, most people would have used old pots set into the… |

|
49. HR area, corbelled arch drain Many large covered drains were constructed with corbelled arches. These drains ran beneath streets and lanes and were large enough for workmen to enter and clear any obstructions. |

|
50. HR area, Dead man's lane and First Street The small lane at the left side of the photograph was called Dead Man's Lane because of the discovery of a single skeleton where the wall juts out into the lane. The large street running north south… |
")
|
51. HR area, large courtyard (room 70) In some neighborhoods, large courtyards were connected to numerous smaller buildings built at different levels. The pilastered wall on the left supported houses at a higher level. A large corbelled… |
 with blocked drain in the background")
|
52. HR area, large courtyard (room 70) with blocked drain in the background A small room located at the edge of the street (in the center of the photograph) is where fourteen skeletons of so-called massacre victims were discovered. |

|
53. Dyer's Workshop, VS Area This room in VS area was made with bricks set on edge to create a watertight floor. A small well was located in the southeast corner (top right) and circular brick depressions were set into the floor… |

|
54. Room of the Skeletons, HR Area The small room in the center of the photograph contained 14 skeletons, thought to be the remains of a massacre. |

|
55. Blocked Corbelled Drain, HR Area As structures were filled and street levels were raised, the drains eventually became useless and were blocked with debris and brick walls. |

|
56. Wells and walls, DK-G Area This general view of DK-G area shows multiple walls built at different time and two wells that were used up until the last phase of occupation. |

|
57. Looking down inside two rooms, DK-G area, near chief's house This view into two small rooms shows tapered walls that were built to support a second floor. Later rooms were built directly on top of these walls because they provided a strong foundation. The wall… |

|
58. Remodeled walls, DK-G area As houses were built on top of earlier structures, the windows and doorways were blocked up. Notice the changing alignments as the walls were remodeled. |

|
59. Large Courtyard with mud brick filling, DK-G Area This large room or courtyard was filled with a solid mud brick platform that was almost entirely excavated to investigate the underlying room. A section of the platform has been preserved beneath the… |

|
60. Conservation and Remodeling, DK-G Area Many of the original walls and features of the ancient buildings in DK-G area have been rebuilt and modified through conservation. The salt encrusted footings represent the original wall; a line of… |

|
61. Chief's House, DK-G Area The original walls in a large building complex referred to as the Chief's house have been repaired and conserved. This view shows some reconstructed ground floor rooms and steps leading to a second… |

|
62. Chief's House, DK-G Area The original walls in a large building complex referred to as the Chief's house have been repaired and conserved. This view shows part of a large courtyard and the top of a well on the left. |

|
63. Narrow Lane, DK-G Area Oxcarts could not reach many of the urban neighborhoods. Pack animals and pedestrians could have used this narrow lane. |

|
64. Blocked Street to the east of First Street, DK-G Area The excavations of DK-G area focused only on the section to the west of First Street. Unexcavated streets and houses lie to the east of First Street, waiting for a day when archaeologists have… |

|
65. First Street, DK-G Area Looking north along First Street. The area to the left has been fully excavated and the area to the right is unexcavated. Later street levels are seen in the background. |

|
66. Narrow Streets and Drains, DK-G The streets and alleyways wind through the neighborhood and are oriented along a strict grid plan. |

|
67. Stairs leading to the second storey, DK-G Area Some houses had small staircases leading to a second story or to a platform for pouring water into a bathing area. |

|
68. Narrow Streets, DK-G Area The doors of later buildings can be seen in the upper levels of the wall to the left. The gradual tapering of the walls in the far right was an intentional architectural feature to avoid collapse of… |

|
69. Narrow Streets, DK-G Area The main street running north south along the east edge of the Great Bath ends with this unique brick platform. The hollow sockets would have held wooden beams that may have formed a gate or traffic… |

|
70. Traffic Control Block and Street, SD Area Looking south along the street to the east of the Great Bath. In the foreground is a unique brick platform with hollow sockets used to place upright beams that may have formed a gate or traffic… |

|
71. Street with Limestone covered Drain SD Area Looking north along the street to the east of the Great Bath. The building on the right is a single large structure called the College, and may have been the residence of priests or other elites (see… |

|
72. Limestone drain covers, SD Area This large drain was partly covered along its length with large flat blocks made out of limestone from the Rohri hills, which are located to the north and on the other side of the Indus River. |

|
73. Covered Drain, SD Area Covered Drain emptying down slope on major street leading to the Great Bath. |

|
74. Covered drain, Divinity Ave, SD Area This street, called Divinity Street by the early excavators, has a small drain with brick coverings. The street runs north south along the east side of the College building. The massive walls on the… |

|
75. Small well and platform, VS Area Small well and platform in VS area, with HR Area in the background and VS dyer's shop across the street to the right. |

|
76. Large Well, HR Area Wells were made with wedge shaped bricks to make a strong circular structure. Some bricks were made with special grooves to keep the ropes from sliding sideways when drawing water. |

|
77. Oval Well, SD Area This oval well is located in room 19 northeast of Great Bath. It is the only well with an oval structure and may have been used to draw water for nearby bathing platforms or for filling the Great… |

|
78. Public well, HR Area Although most wells were located inside private buildings, the city planners of Mohenjo Daro provided some public wells that could be accessed directly from the main street. This well and nearby… |

|
79. Well and platform, DK-G Area This well was associated with a finely constructed bathing platform. A stairway leads up to the well and platform from a lower room. The walls and well have been covered with mud brick and sprayed… |

|
80. Private Well, DK-G Each block of buildings at Mohenjo-Daro was supplied with one or more wells such as this one in DK-G Area. When archaeologists excavated the fill around the well they were left standing to show the… |